
What to Wear Camping in the UK: A Practical Layering Guide for Changeable Weather
UK camping can involve feeling too warm while carrying a bag to the pitch, then wanting more insulation once activity drops. Changeable conditions make a fixed outfit awkward; layers give you more room to adjust.
Outdoor organisations including the British Mountaineering Council and Mountaineering Scotland describe a straightforward system built around layers. The useful skill is knowing which job each garment does, then adjusting the combination.
In a nutshell
- A useful starting point is a three-part system: a base layer to move moisture away from your skin, a middle layer to trap warm air, and an outer layer to keep out wind and rain. Add, remove or vent them according to the activity and conditions, rather than assuming all three must always be worn.
- Cotton is a poor choice next to the skin or as insulation whenever it’s likely to get wet or sweaty, since it holds onto moisture and can leave you cold rather than keeping you comfortable.
- Synthetic insulation keeps some useful warmth even when damp, whereas down loses insulating performance when wet, which matters when deciding what to pack as a spare.
- Keeping a dry spare layer protected inside a waterproof bag or liner is a sensible precaution whether you’re driving to a pitch or carrying everything on your back.
1Three layers, three different jobs
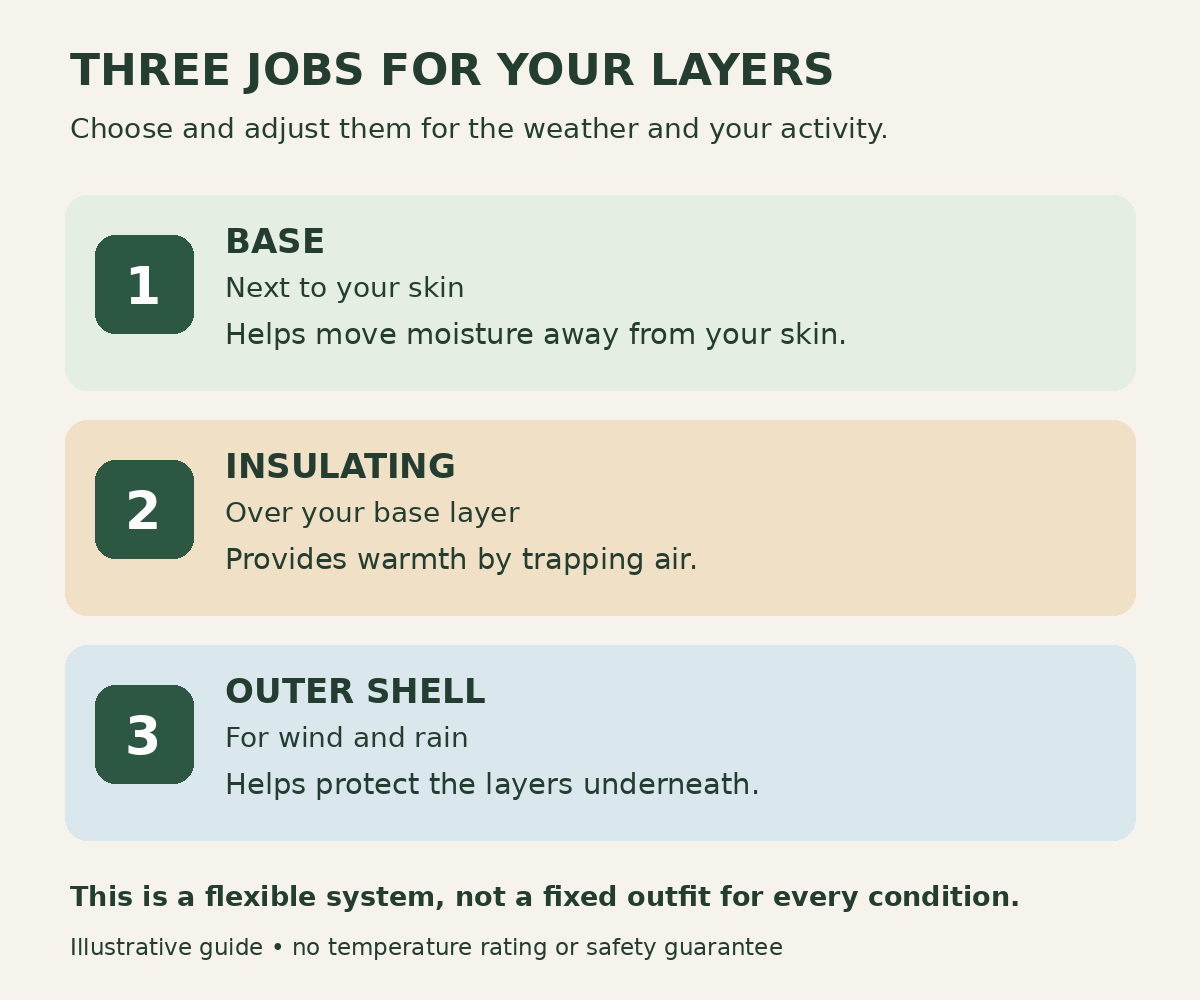
Think of camping clothing as a small system. Each layer has a distinct job, and you can combine, remove or vent them according to the activity and conditions.
The base layer sits next to your skin, and its main job is to move perspiration or moisture away from your body rather than letting it sit there. Both the BMC and Mountaineering Scotland describe this as the base layer’s primary role.
The middle layer provides insulation by trapping warm air around the body, limiting heat loss.
The outer layer has a different job entirely: it’s there to block wind and rain so that the inner layers can keep doing what they’re meant to do. As the BMC puts it, the outer layer is the main protection from the weather and allows everything underneath to function properly. A good outer shell matters, but it isn’t an insulation system by itself; it’s protection that lets your base and middle layers carry on working.
The useful part is the adjustment. You can vary the combination as the weather or your activity changes, rather than staying with the outfit you chose at home.
2Choosing fabrics and checking the fit
Fabric choice matters more than it might seem, particularly for the base layer. Cotton is the classic trap here. In conditions where you’re likely to sweat or get rained on, cotton absorbs moisture and holds onto it, which can leave you damp, clammy and cold, according to both the BMC and Mountaineering Scotland. This isn’t a blanket condemnation of cotton; the concern is using it next to the skin or as insulation when it is likely to become wet or sweaty.
For the middle layer, the same caution about cotton in wet or sweaty conditions applies. For damp conditions, fleece or a synthetic insulated garment may be a practical middle-layer option.
If you’re thinking about a spare insulating layer for cold evenings or sudden weather changes, there’s a useful distinction worth knowing. Synthetic insulation can retain some useful warmth even when it’s damp or wet, according to both the BMC and Mountaineering Scotland, which does not mean a wet garment should be treated as equivalent to a dry one. Down, by contrast, loses insulating performance when it becomes wet. That’s a reasonable factor to weigh when choosing what to pack as backup, rather than a reason to avoid down altogether in dry conditions.
The BMC advises choosing a close-fitting base layer. It is also worth trying the layers you expect to combine so you can check comfort and movement, including with a rucksack if you will be carrying one.
3Car-access camping or carrying your kit
How you’re getting your kit to the campsite changes what’s sensible to pack, even though the underlying clothing layers do the same job either way. If the car is parked close to the tent, you may have room for trip-appropriate changes of clothing or comfort items that you would not choose to carry on foot. That does not make every extra item useful, but it gives you more flexibility.
If you will carry everything, check what the route, weather and planned stay actually require. Then separate essentials from optional extras. Keep the load manageable for the person carrying it; a packing target that suits one camper may be wrong for another.
Make a fresh kit list for the venue, forecast, activities and site rules. Mark optional items clearly so you can reduce bulk without accidentally removing something needed for warmth, weather protection or the planned activity.
So the practical split is this: if you’re walking in, confirm what’s actually required for that trip and your conditions, then trim only what’s genuinely optional for you. If you’re car-camping, the extra capacity is better spent on trip-appropriate changes of clothing or reasonable comfort items, within whatever the site allows, rather than assuming more is automatically better.
4Adjusting layers as the day changes
Keep two things in mind as the day changes: how hard you are working, and what the wind and rain are doing. They may call for different adjustments.
When exertion rises and you begin to feel too warm, vent or remove insulation as needed while retaining the weather protection required by the actual wind and rain. Mountaineering Scotland specifically flags that the outer layer should be breathable and able to be vented so that perspiration escapes rather than soaking into the mid layer (mountaineering.scot).
When you stop, cool off, or the weather turns, the reverse applies: more insulation goes on, added according to how you personally feel and what’s actually happening outside, rather than at some fixed point on a thermometer. Keep the weather protection required by the actual wind and rain while adjusting or venting insulation as needed. The outer layer protects against the weather; it does not replace the separate insulating job of a middle layer.
5Keeping a dry change available
Pack your spare dry layer inside a sound waterproof bag or liner, separate from wet equipment. Give other items that need to stay dry their own protection rather than relying on the rucksack’s outer fabric alone.
The sensible application of that for camping is straightforward: before you’re exposed to rain or wet ground, get your spare dry layer sealed inside its own waterproof bag or liner, separate from anything that’s likely to get damp. That’s not a guarantee against every leak or an unplanned dunking, and a liner with a split seam or a bag left open at the top won’t do much good, so it’s worth checking the bag is sound and properly closed rather than just assuming plastic equals dry.
6Clothing mistakes worth avoiding
Watch for these mismatches between the layers you pack and the jobs you need them to do.
- Wearing cotton next to the skin or as insulation when it is likely to become wet or sweaty. Its moisture retention is the concern; this is not a rule against cotton in every situation.
- Treating a down jacket as weatherproof insurance. Down loses insulating performance when wet, while synthetic insulation can retain useful insulation when damp or wet.
- Assuming one jacket does every job. A waterproof shell provides weather protection, while a middle layer provides insulation; adjust each according to the conditions and activity.
- Treating the forecast outfit as fixed. Keep enough flexibility to add, remove or vent layers as the activity and conditions change.
- Leaving a needed spare layer unprotected. Before exposure to rain or wet ground, place it inside a sound, properly closed waterproof bag or liner.
7A practical check before you leave
Run through these questions before you pack, and again before you head out for the day. Use them to match each layer’s job to your trip.
- What’s each layer actually for on this trip? Check that you have considered moisture next to the skin, insulation and protection from wind and rain. If you can’t say what an item in your bag is for, it’s worth asking why it’s there.
- Am I carrying this, or driving it in? If you’re walking with the kit, confirm what’s genuinely required for the trip and trim only what’s clearly optional; if you’re car-camping, use the spare capacity for sensible changes of clothing rather than just more stuff.
- Do I need a dry spare? If so, protect it inside a waterproof bag or liner before exposure to rain or wet ground.
- What’s the exertion level doing, and what are the wind and rain actually doing right now? You may need to vent while still retaining the weather protection the conditions require.
- Does the base layer fit comfortably beneath the other layers? Try the combination together and check that you can move freely.
- Have conditions moved beyond what this trip and this kit were planned for? If so, the sensible answer may be changing the plan rather than adding another layer and hoping.
Read next
When the Weather Turns: How to Prepare for the Unexpected in the UK Outdoors
Prepare for changing UK weather with practical advice on planning, clothing, shelter and knowing when to change your plans.
Why tents get condensation — and how to reduce it
A practical UK camping guide to why condensation forms, how to distinguish it from a leak and how to manage moisture without compromising weather protection or safety.
Join the conversation
What has worked for you? Share a useful tip, ask a question or tell us about your experience. Keep it friendly and leave out personal contact details.
Comments are reviewed before appearing. Your display name and comment will be public; your email address will not. How we handle your information.